DIY Laundry Room Reveal
Can you believe my DIY laundry room makeover cost only $71.00?! With some creative solutions and repurposing, it was easy and you can do it, too!
Alright folks, it's time for the laundry room reveal. It feels a bit unnatural to be so excited about a laundry room. I mean, it's a laundry room. It's where fun goes to die. But I am seriously, head-over-heels in love with this room and I totally transformed it in a few days with only $71.00 out of pocket!
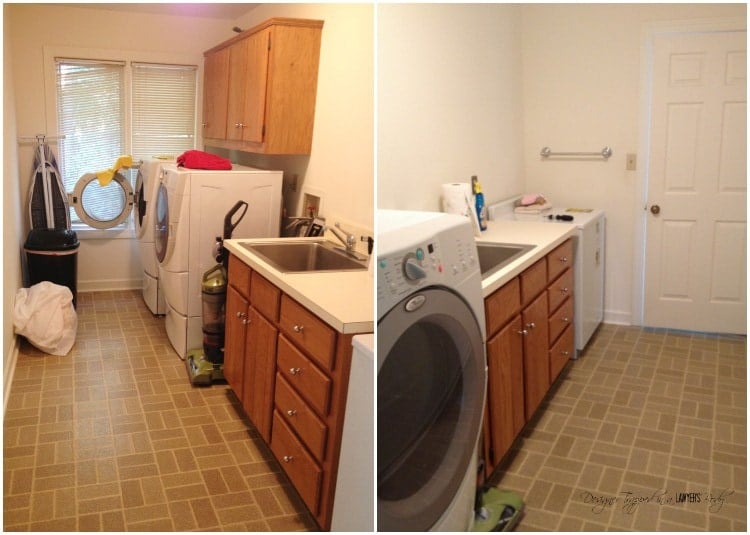
First, let me remind you of how this room looked before I got started. Yuck. And you can tell we took no pride in the room whatsoever. I mean, the blinds were crooked. It would have taken 5 seconds to straighten them, but we never bothered. We just got in and out of the room as quickly as possible.
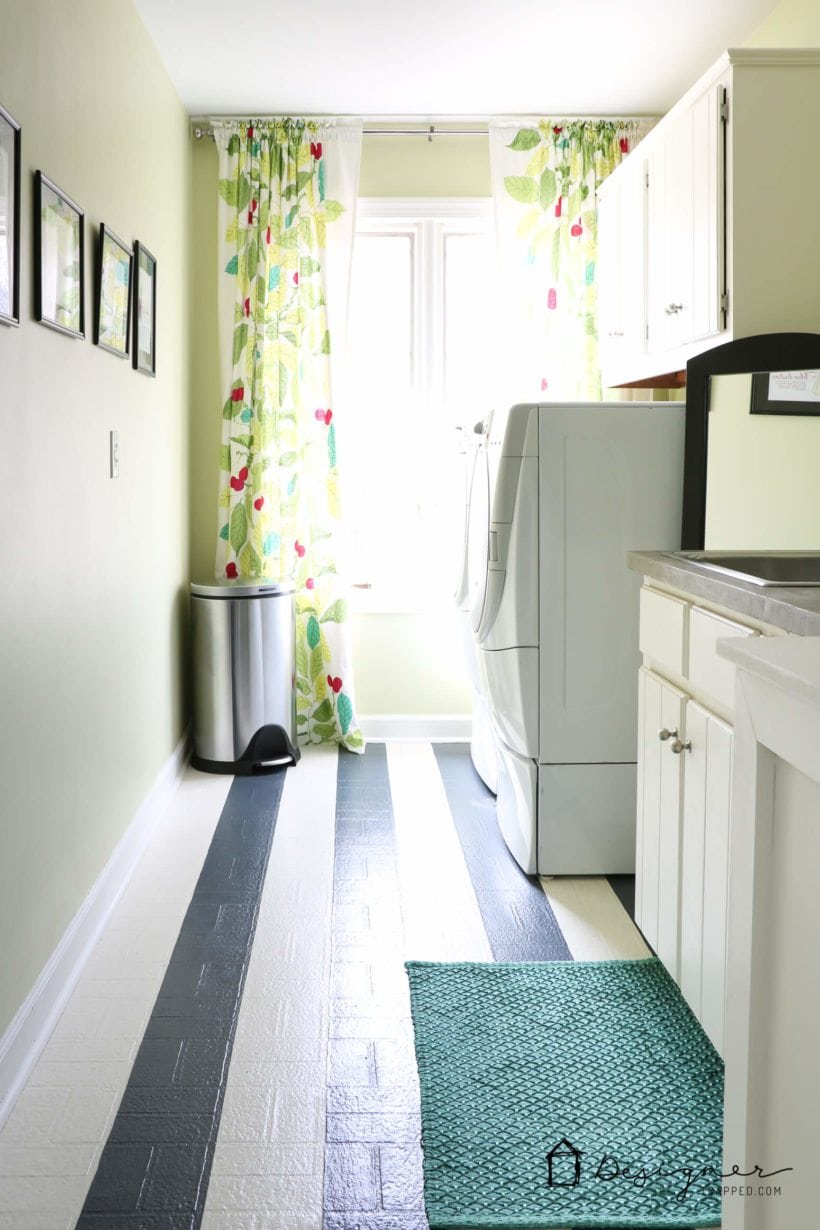
BUT NOW?!?! It's colorful, bright and happy!
This DIY laundry room renovation is the perfect example of going shopping in your own house. We all have things that are left over from other projects or are no longer being used, right? Take a look through your own house and find leftover paint and accessories that work together.
The jumping off point for this laundry room makeover was the curtains that I already owned but were no longer being used. From there, I “shopped” for paint and other items that would work with them.

This post contains some affiliate links. Please click here to read my full disclosure policy.
So, what all did I do in the laundry room?
- Painted the cabinets– I used an antique white paint that was leftover from some other project. I also had some primer on hand already. Cost- $0
- Painted the walls– I used the leftover paint from the girls' room. Cost- $0
- Painted the floors– We bought two quarts of porch paint (grey and off-white), which was plenty. Cost- $30. A detailed, step-by-step tutorial on how to paint your vinyl floors can be found here. I think the painted floor provides the most dramatic change in this room and it was EASY and CHEAP! This is a popular project–it has been pinned more than 40,000 so far!
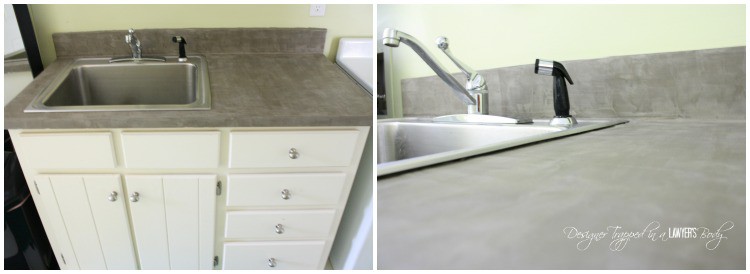
- DIY Concrete Countertop– I covered the ugly laminate countertop with Ardex Feather Finish, which I also had left over from another project. This product is amazing and it is a totally doable DIY job! You can see our tutorial for how to apply it in this post. If you can't find Ardex Feather Finish where you are locally, you can buy it on Amazon. It allowed me to create a cheap and easy DIY concrete countertop–YAY!!!! Cost- $0
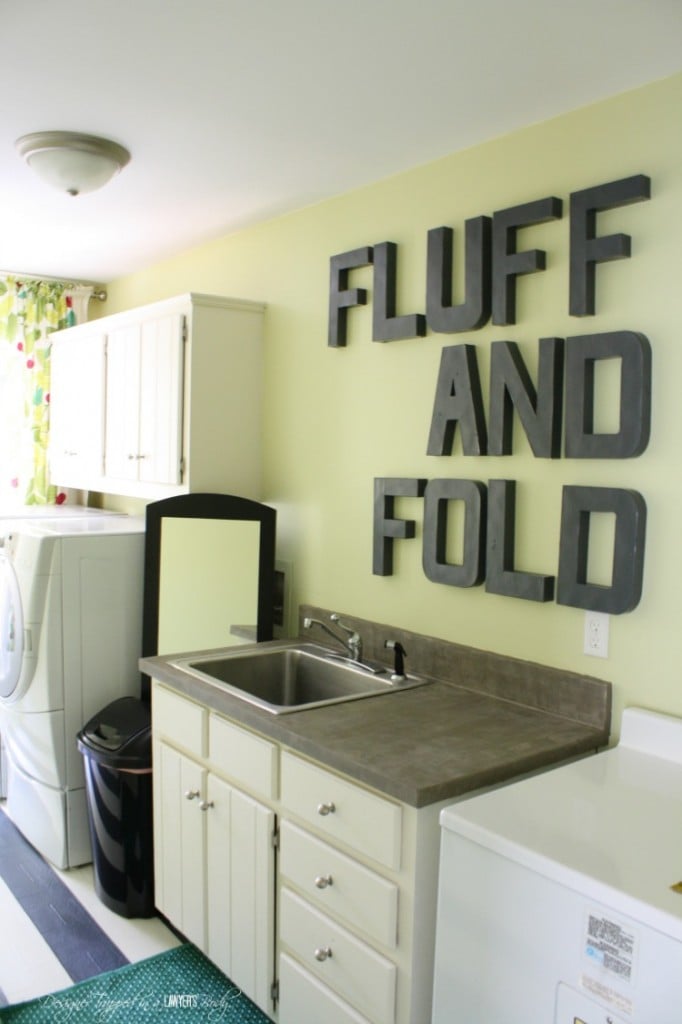
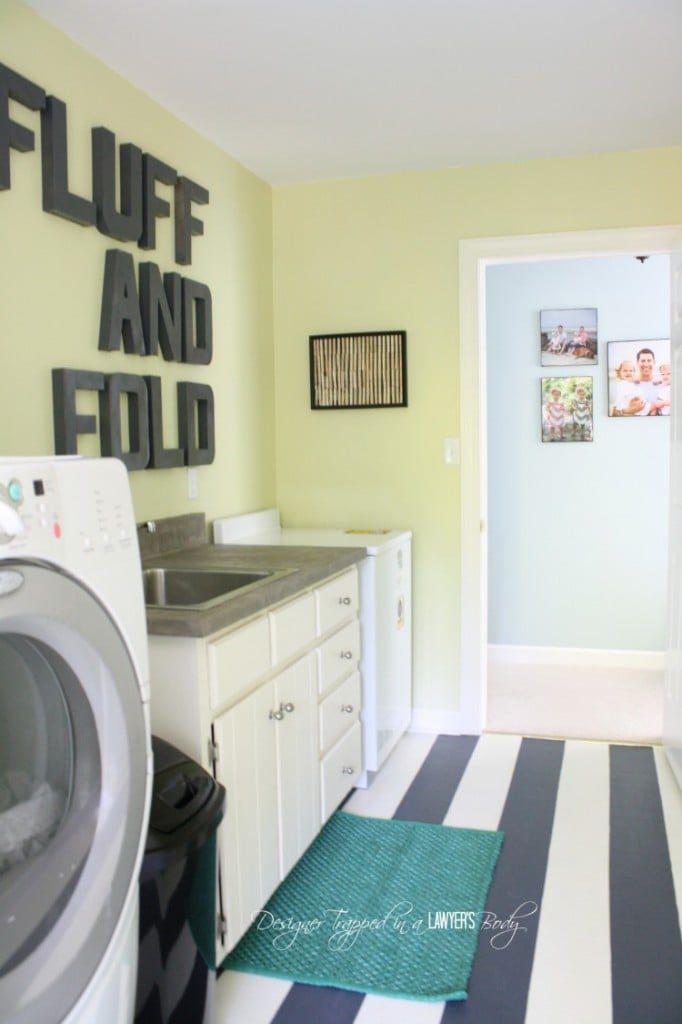
- Added decorative details– I hung the FLUFF AND FOLD paper mache letters (total cost of letters + spray paint = $35) and added the small rug from Pier One to the floor in front of the sink. I purchased it with a gift card (out of pocket cost $0, “actual” cost $19). I also used an old, shabby shadow box and $6 worth of clothes pins to make the decorative art that is hanging by the door.
- Hung curtains– I already had the curtains that were previously used in another room. Can you believe those beauties were being stored in a chest?! I love them.- Cost- $0
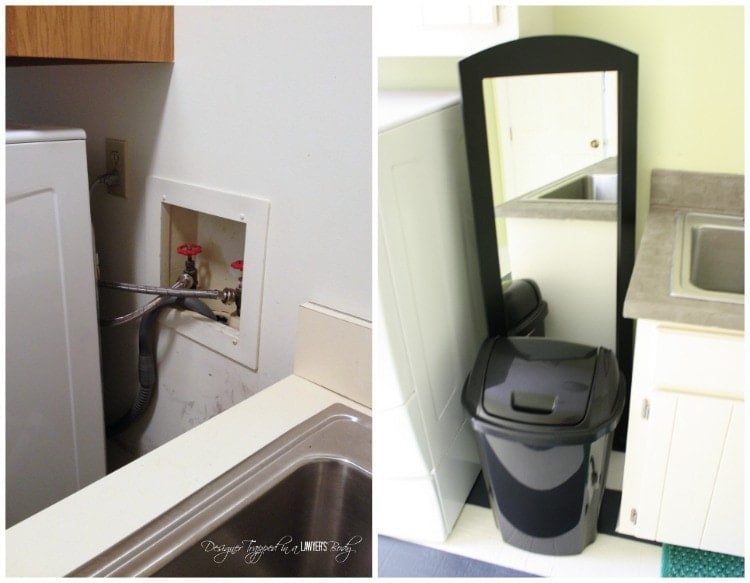
- Creatively placed a mirror to hide all the ugly plumbing connections (see below)- I already owned the mirror, which was given to me as a gift, and it was being stored in another room. I was glad to finally be able to use it. Cost- $0
GRAND TOTAL OUT OF POCKET COST: $71.00
The makeover took me a total of 12 hours, and I did all the work by myself, with the exception of putting new hinges on the doors and rehanging them (which my husband did one day while I was at work). So, we are talking maybe a total of 13 man hours. NOT BAD! I do still have some finishing touches to attend to. For example, the huge BLANK wall opposite the washer/dryer and sink has nothing hanging on it, which must be fixed.
What do you think? What is your favorite part? The painted vinyl floors, the DIY concrete counter top, or something else?
More INTERIOR Design Tips
Wondering how I approach transforming rooms and spaces in our home? Check out Designer in a Binder®.

And if you want exclusive content and behind-the-scenes sneak peeks, be sure to subscribe before you head out!

Last Updated on March 3, 2022
Excellent!
I used to own a paint store, and of course the paint companies said you couldn’t do this. But I did it and it worked perfectly! Instead of the design you chose, I used a Mexican “saltillo” tile motif (which required a little “scumbling” but wasn’t difficult).
Best part was when I sold the house, the Realtor was so happy we had a real Mexican tile floor in the kitchen. I didn’t say a word…
That’s awesome Nicholas! Thanks for reading :)
I love the painted vinyl flooring! How has the paint held up to the traffic? Our laundry room also has an outside entrance. I am hesitant to paint the floors knowing kids will be coming in muddy, wet, etc., but I love it! Has the paint held up over time?
I have used the same paint in my kitchen and it is very high traffic and have had no problems!
Looks amazing. Getting ready to tackle my garage makeover now. Surfed over to your blog for inspiration. Just wondering what brand of paint you used for the cabinets and if it’s holding up. There are mixed results/reviews regarding the chipping off of pint over time. Thanks.
I used a regular latex paint and it chipped quickly. If you want a better option read about my kitchen cabinets here: https://designertrapped.com/how-to-paint-kitchen-cabinets/ Good luck and hope this helps!
GORGEOUS
i love every square inch! its lovely. a job well done!
Thanks so much Diane!
Hi, Tasha! The change is amazing, but doing that for only 71$ is awesome!! I love everything in that room, I even thought the mirror was simply for decorative purposes but it had a function!!
I would love if you could share this at the party I host every Tuesday, which is called Two Uses Tuesday.
Hugs,
Pili
You never cease to amaze and inspire me!! Love the whole project. I have a laundry closet and it is “where fun goes to die”. Lol. Thanks for sharing.
Thanks so much, Pam! You are so sweet :)
What a great look
Thank you, Lisa!
Looks fabulous Tasha! Love oversized words on the wall!
Great job! It turned out beautifully! The floors are my favorite part. Love how you used existing items from your home. I do that alot- changes this up and makes a world of difference! :)
THIS is the kind of makeover I love. Who wants to read an article titled: “My easy $700 makeover”? Not this girl. I love to see people use what they’ve got in new ways and make it fabulous. Great job! The room is beaUUUtiful!
Thanks so much, Elizabeth!
Awesome job…very cheerful, clean, and peaceful looking!
Thank you, Rhonda!
I love it all. It makes me want to get in my laundry room and make it over. My favorite part is actually the simple mirror trick. I would have never thought of doing that. I love it!! Ok, and the curtains!
Thanks so much, Jessie!
So did you remove the laminate like Kara did or just concrete over the laminate? Want to make sure I do it right if I do decide to do this in my kitchen, and I’m pretty sure I will!
Hi April! I put the concrete right over the laminate :) You have to sand the laminate and scrape it up first so that the concrete adheres, but that step goes quickly!
When you painted the floors of your laundry room did you move your washer and dryer or paint around them?
Hi Karen! You can read about exactly how we did it here: Short answer is that we did paint under our washer and dryer and then moved them back into place.
Your cupboards did not look like beadboard when they were wood. With the white they look like bead board. Did you do something or were they bead board all along? Thanks. So cute.
Hi Pat. They were “bead board” all along. Each cabinet door is actually made from 3-4 separate pieces of wood, so there are ridges in between them. Hope that helps!
Please tell me where you purchased those fun curtains from?
Love them!!
Thanks,
Kelly
Aren’t they great, Kelly?! I purchased them from Ikea years ago. Happy new year!
this looks beautiful! i love the before and after. and for so little money! i am searching for some serious inspiration for my house. im going to look around your blog:)
Yay! Thanks so much, Melanie! I hope you found some inspiration!
Oh. My. God. I had NO CLUE you could do this! I have had a hate/hate relationship with my Armstrong Vinyl floors since about a year after they were “professionally” – using the term loosely here – installed by my local Home Depot. Why so bad? First, I didn’t know vynil would or could stain SO EASILY!! Toys that my toddler dropped left scuff marks the same colour as the toys (that will not wash off). A jug of Sunlight dish soap that I was refilling my bottles from, I set it on the floor when I was done to take down to my storage room in the basement – an errant bit of soap that ran down the side while I was washing the dishes, and stained! Bright yellow! :( I unloaded groceries in a snow storm once, and a couple of boxes had a bit of snow on the bottom from me setting them down to get the door open .. yep, you guessed it, there are now stains from the outsides of the boxes on the floor!
THEN, the installers royally screwed up & cut & installed it all, but forgot to run it up the kickplates as they told us would be done when they came to measure it all out!! … so then the installers cut pieces from the extra scraps & put them up & used silicone caulking to seal the line where plate meets floor which of course, being a kitchen & subject to all kinds of water droplets, has made the silicone lift, leaving seam lines that grab dirt & whatever else hits the floor. GRR!
Anyway – thank you SO MUCH for this tutorial! I am now planning to paint my AWFUL vinyl floors in the spring! I was having nightmares about how in the hell I was going to redo the floors, because all the years of putting new flooring on top of old flooring has reduced the amount of clearance I have for appliances and doors (that’s how they do it here, I didn’t know or I would have pulled out the old layers before they came, because when I got a new fridge, they extra layer of flooring meant it was about 1/8 of an inch too tall, so I had to chisel out the bottom of the cupboards!
UGH… so now I can do this instead! So thank you thank you thank you! I will be able to update & make the kitchen floor & bathroon floor look brand new within my single-mom budget.
I have to ask, though … how is the painted floor ageing? It is okay with water drops from wet laundry or anything like that? I wonder if I could paint a layer of clear-coat on top? Hmmm…. food for thought. I’d love to see pictures of the floor now that it isn’t freshly done, just out of curiosity. :)
Hi Erin! SO sorry you had such a bad experience with your floors! You should absolutely paint them. I had planned to post updated photos of our floors {more than 1 year later} because they were in PERFECT condition. We had no chips or peeling whatsoever. But then we had to have our hot water heater in the laundry room replaced and it was HEAVY, so they had to drag it on the floor and it did scrape up some paint {though not as much as I expected}, so I will have to touch that up. But if it wasn’t for that, they would still be in absolutely perfection condition. I also painted my kitchen floors with the same porch and floor paint and they are holding up perfectly as well. DO NOT coat them with polyurethane. We did it on our kitchen floors and it was a huge mistake. So we had to repaint them and start all over again. They are holding up perfectly with no top coat. I hope that helps!!! Good luck!
Thanks so much for taking the time to comment, Erin! Sorry to hear that you aren’t loving your vinyl floors, BUT I am so glad you found my solution! The floors are still in perfect condition. We even used the same paint on our kitchen floors and they are also holding up perfectly with HEAVY use! I would not recommend putting a clear coat on top–it will yellow them. The porch and floor paint is plenty durable on its own. I do plan to do a “how’s it holding up” post, but haven’t had time yet! Hope this helps.
Where did the vacuum and the ironing board go?
Hi Nicole! The ironing board hides out behind one of the curtain panels {PERFECT hiding spot} and the vacuum moves around the house, but mostly lives in our hall closet now.
what is the white thingy to the right of the sink?
Looks like a water heater. :)
You got it, Sami! It is a cabinet style water heater, that as bad luck would have it, started leaking tonight :(
Hi Marie! It’s a cabinet style water heater. I had never seen one before we moved into this house.
I can’t believe this is your first blog post EVER! This proves what a ROCK STAR you are! Happy Bloggiversary!!!
Awww, thank you Leigh Anne! You are SO sweet! So happy to have you as a blogger friend :)
Wow, girl! I feel so late to the game only happing upon this incredible makeover now, but you ROCKED it! There are so many elements I’m in love with – – but the “FLUFF and FOLD” draws me in especially. Perhaps because I absolutely loathe folding laundry and a sign like that actually makes it sound appealing to me. If I had a laundry room like that, folding laundry in it would be a dream – – that’s for certain. Well done, Tasha. And it’s such a solid entry in the CWTS competition. Best of luck!
Thank you so much, Lauren! My laundry room was my debut to the blogging world back in October so you probably missed it because I had ZERO followers back then :) Thanks so much for your sweet comment. Your nautical room makeover is a SOLID entry as well. I can totally see you being selected as a contestant with all of your great projects. Good luck!!!
Tasha, You have done an awesome job. Your laundry looks amazing. Love the floors.
Thanks so much, Reshma!
This laundry room is fantastic!
Hi Brandi! Thanks so much for stopping by and for your sweet comment!
I am wondering what color the paint on the walls is, I love it!!!
Hi Desiree! The color is Soothing Aloe, by Valspar. Thanks so much for reading my blog!
We just can’t enough of laundry room remodels. Thank you for the inspiration. It is so fun to see the evolution of laundry rooms. We have seen bathrooms and kitchens re-imagined, and now it so wonderful to see laundry rooms released from utilitarian gruel. Enjoy.
So glad you like my laundry room renovation! Thanks for stopping by my blog and taking the time to comment :)
I am curious about painting the cabinets. Did you have to prep them at all (i.e, sand) or did you just paint them with primer, then a base coat?
Hi Donna! Other than cleaning the cabinets a bit, I did not prep the cabinets at all. If I had been painting kitchen cabinets, I would have done more thorough cleaning and light sanding first {since kitchen cabinets can accumulate grime even in the cleanest of kitchens}, but for the laundry room, I did not think it was necessary. So, I did some light cleaning and then primed and painted them. I hope that answers your question :) I am happy to answer any other questions you may have!
That laundry room looks amazing! Love the countertops!
Thank you so much, Claudia! The countertops look even better in person. I could not get a photo that does them justice!
Hi Tasha! Thanks for sharing this at the Remodelaholics Anonymous link party awhile back! Cassity and I love it and we’d love to feature you! If you’re interested, will you just drop me a line at hello@remodelaholic.com and we can discuss the details? Thanks!
Hi Lorene! Oh my goodness, I would love that! I have send you an email. Thanks so much! And please pass along my greetings and gratitude to Cassity and Justin as well!
I <3 your fluff & fold! Pinned:)
This is fabulous! Your room is long and narrow like ours and we also have a concrete counter top. Our laundry room has been a work in progress for five years, but we’re so stinking close to having it done! I just need a curtain on my small window and I love the papier mache letters over the sink. Thanks for the inspiration!
Thanks, Jessica! I would love to see how yours turns out when you are done. Don’t you just LOVE concrete counter tops?!
It’s gorgeous, Tasha! Awesome job, fantastic budget! Love every detail! Did you see the peek of letters I shared on Instagram last week? I’m doing something similar in my laundry room makeover! Great minds DIY alike! :)
Thank you, Roeshel! The budget was definitely a highlight of this room. It’s rare that I complete a room reno with only $71 :) I am not on Instagram, but I am going to try to figure out a way to check out your sneak peek now!
Found the sneak peek of the gorgeous green letters! I cannot WAIT to see what you do with them. I am still drooling over your gorgeous family room makeover. I love following your blog!
Hi stopping by to let you know you have been featured this week at One More Time Events…. Hope you can join in again this week….Thank you for sharing…Tammy
Thank you so much, Tammy! I just linked up again this week. I can’t tell you how much I appreciate you featuring my laundry room. I hope you have a wonderful Thanksgiving week!
What a BEAUTIFUL update! You really did a great job. I’m in love with those floors. I’m hosting a pillow cover giveaway that you should enter. http://homecomingmn.blogspot.com/2013/11/michelle-dwight-designs-pillow-cover.html
Thank you, Kayla! I will check out your pillow cover giveaway right now. Thanks for letting me know about it!.
If I had a laundry room, I’d be super stoked to give it a makeover. In fact, this post makes me super jealous that I don’t have a laundry room. It’s looks GREAT!
Found ya at That DIY Party linkup.
Hi Michelle! Thank you so much for stopping by and for your sweet compliments :) This is the first house I have owned with a dedicated laundry room and I have to admit that I love it. I hope you’ll stop by again soon!
I’m in awe of your laundry room!! AMAZING!!! I shopped my house too for my laundry room..I just couldn’t justify spending a lot of money on a room no one sees but me. Anyway, I found you from Life on Lakeshore Drive and will follow you through Pinterest and Facebook to see your awesome projects!
Thank you so much, Selene! I am excited to have found your blog and look forward to following you on Facebook, Pinterest and Bloglovin. I finally added my blog to Bloglovin and would love for you to follow me there.
The room looks great! I’m thinking about the DIY concrete counters now…
Thank you, Melinda! It really is easy. You can call Ardex (the manufacturer) and they can give you information about stores in your area that sell the Feather Finish product. Good luck!
I love the FLOOR! I have been searching for something to do with mine – that look just like yours (did)!! Can’t WAIT for the tutorial! Yes, PLEASE! :) (And I sure hope I don’t miss it!!)
Thanks for leading the way!
I have been SEARCHING for something to do on my floor that looks JUST like yours (did)! PLEASE! Can’t WAIT for the tutorial on this one and hope I don’t miss it!!!!!
Thanks for leading the way! :)
Thanks for stopping by, Jan! I PROMISE you can do this–painting your floor is SO easy and quick. I would love for you to follow my blog so that you don’t miss the post. I should have it up some time in the next two weeks. Stay tuned!
I LOVE it….all of it but esp the floor. Amazing change.
Thank you, Pam! The floor is definitely the most dramatic change. I smile every time I go in the laundry room because I love it!
“It’s where fun goes to die.” Bahahaha! I need to store that line away for the future. Fantastic makeover for such a low cost. Our laundry room has linoleum floors also and they gots to go! Thanks for sharing…visiting from Home Sweet Home.
Thank you for stopping by, Luisa! I am glad you enjoyed it. You really should try painting your floors. It’s so quick and easy!
This is the best transformation! Those floors are awesome. Great job!
Awww, thank you! I can’t get over how much I love this room now and the floors are my favorite part!
I am featuring it today at Home Sweet Home!
Sherry
THANK YOU! I am just so excited you are featuring my laundry room :)
Thank you, Sherry! I enjoyed linking up at your party last week and plan to join every week. Thanks for hosting!
This is wonderful!
Sherry
Thank you, Sherry! I enjoyed linking up at your party last week and plan to join every week. Thanks for hosting!
This room is both gorgeous and cheap – the perfect combo! I love how it turned out – especially the concrete counter and fluff and fold letters. It looks amazing and I also love that you used stuff you already had. Look forward to seeing your future projects!
Thank you, Carrie! I appreciate it. PS- I really enjoyed your post about 6 blogs worth reading. Some of them I had not heard of and am excited to check them out!
It’s official! You have convinced me that my next project is going to be my laundry room. I spend so much time there with all the laundry I do for family that it really should be a happy place to be. Those curtains really are amazing. Can’t believe you had those hidden away. Painting the cabinets white also gives it such a clean look. I may have to start there.
Thank you, Christina! You won’t regret it. This is definitely one of my favorite rooms we have ever renovated (in any of our three homes). It just makes doing laundry less miserable. I did prime the cabinets first and then did two coats of paint. It went pretty quickly. Good luck! I hope you’ll post about it on your blog when you are done. PS- I love the concept of your blog!
Your laundry room transformation IS amazing! I love the floor. The “Fluff and Fold” just tops it off. You did a really great job!
Thank you so much, Alli! I really appreciate it and thanks for stopping by!
wow!! what an incredible transformation into a bright fresh happy space – bring on the laundry!! well done! so glad to have found you via cozy little house!
♥ Northern Cottage {http://www.NorthernCottage.net}
Thank you so much for the compliment and for stopping by! I am on my way to check out your blog right now!
Your laundry room looks wonderful. I really like sign ” Fluff and fold ” and the paint job on the floor really great idea. Most of all love the price tag :)
Have a great weekend !
best,
marlin
Thank you, Marlin! The price tag is one of my favorite parts as well. I hope you will check back for more thrifty DIY reveals!
such a huge change! I love the painted floors the most.
Thank you! I could not believe how easy it was to paint the floors AND how dramatically it changed the room! I am going to check out your blog now. I hope you’ll pop back over here some time. I am going to reveal my playroom renovation this weekend!
Love this! I would be happy to do laundry in here everyday! Great job.
Thanks so much, Ashley. It certainly makes doing laundry less of a chore (though if I could wave a magic wand to get the laundry done, I totally would). Thanks for checking it out–I hope you will come back. I will be revealing our playroom makeover this weekend.
Wow! What a tranformation! I love it all but especially the counter top and the paper mache letters!
Tania
Thank you, Tania! I am thrilled with what an impact the paper mache letters make. I used to keep the door to our laundry room shut all the time so I didn’t have to look at it, but now I make sure the door is always open (which is hard because my almost 3-year-old twin girls LOVE to close doors right now). I hope you’ll stop back by sometime!
I think it looks amazing! The curtains really are fab and bring so much “happy” to the space!
Thank you, Carol! The curtains are one of my favorite touches as well. Can you believe they are from Ikea?
Hands down you did an amazing job. The room is now light and airy. I really enjoyed this inspirational post. I would love it if you would share this post at our What’s It Wednesday linky party? Hope to see you there!
Paula
ivyandelephants.blogspot.com
Thank you, Paula! I would love to link your party. Thanks so much for the invitation!
Amazing! And doesn’t that make doing the laundry so much more fun?! Love the low cost, and 12 hours is good. I need to do something for my poor laundry room :)
Saw your link at Our Home Away from Home, thanks for sharing with us.
Mary
Thank you, Mary! Yes, it DOES make doing the laundry more fun and we have plenty of laundry with twin toddlers :) Thanks for stopping by! I hope you will come back soon!
WOW! Amazing transformation! I would have never thought about painting the floors! The concrete counter tops and white cabinets give the room a clean, crisp, industrial touch. Love!
Thanks so much, Jessica. I never thought I could love a laundry room so much :)
This comment has been removed by the author.
This comment has been removed by the author.
Wow – what a transformation. I love the painted floors. I would love for you to come and link this up at my link party that opens each Tuesday evening at 8pm EST. Hope to see you there. http://diybydesign.blogspot.com
Thank you, Judy! I will be at your party. Thanks so much for the invitation!
Thank you so much, Aimee! I will most certainly share at your linky party and check out your blog. Thank you for letting me know about it! – Tasha
Love Love Love! Come share at my new monthly linky party — Organization Ideas AND Room Reveals — it just opened! XO, Aimee
http://www.itsoverflowing.com/2013/11/home-organization-ideas/
Thank you so much, Aimee! I will most certainly share at your linky party and check out your blog. Thank you for letting me know about it! – Tasha
Gorgeous! I’m so happy to see your painted floors turned out so well. Love them! Love the whole thing!
Kelly @ View Along the Way
Thank you, Kelly! I can’t thank you enough for the painted floor idea! Such a phenomenal idea!